A single water spot on your ceiling during heavy rain could be the first sign of serious structural damage and dangerous mold growth.
Roof leaks during heavy rain start subtly but escalate into major problems quickly. Failed pipe boots, improperly driven roofing nails, and damaged flashing around your chimney or vents are the usual suspects. Your ceiling’s water leaks during rain become especially concerning because they indicate moisture has already breached multiple layers of your roof’s defense system.
The situation isn’t hopeless. You can protect your home with immediate action, even during a downpour. We’ll show you proven emergency fixes in this piece to stop roof leaks, prevent water damage, and safeguard your valuable belongings until professional help arrives.
Identify the Leak Source
Roof leaks can be tricky to pinpoint because water often travels along beams or rafters before it drips onto your ceiling. Quick detection of the leak’s source helps you avoid major structural damage and mold problems.
Signs of ceiling water damage
Your home’s interior shows subtle changes when ceiling leaks first appear. Copper or rust-colored stains on your ceiling are clear signs of water getting in. On top of that, it’s common to see peeling paint or bubbling wallpaper when moisture seeps behind your walls.
Your attic or upper floors might smell musty before you notice any visible damage. The ceiling’s sagging or bowing sections show that water has built up above. You’ll want to look out for hairline cracks that spread like a spider web across your ceiling – these show up as water weakens the drywall.
Mold growing where walls meet the ceiling points to ongoing moisture issues. Dark patches that look worse after rain are sure signs of active leaks in your roof.
Common leak entry points
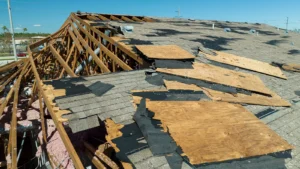
Water can get through your roof in several weak spots. Missing or damaged shingles create direct paths for rain to seep under the surface. The flashing around chimneys, vents, and skylights often fails and causes leaks.
Poorly installed roofing nails are a big risk – water follows the nail shaft straight into your house. The valleys where two roof slopes meet handle lots of runoff and can start leaking if their flashing wears out.
Clogged gutters make water back up under your shingles and find ways inside. The boots that seal around plumbing vents crack as they age and let water slip through.
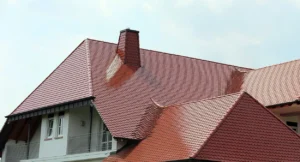
Skylights need extra attention since both glass and seals can develop problems. Your chimney’s protection depends on multiple types of flashing to keep water out.
Note that water damage might not show up directly below where the leak starts. Water usually pools in your attic before escaping through light fixtures or soffit vents. That’s why checking your attic space carefully is key to finding the real source of leaks.
Quick Interior Protection Steps
Water dripping through your ceiling needs quick action to limit interior damage. You can save thousands in repair costs by protecting your home’s interior the right way.
Containing water spread
Clear a path around the affected area so you can move safely. Use towels to soak up any standing water on your floors to prevent slips and water damage. A screwdriver can help you make a small hole in the center of bulging ceiling areas that hold water. This channels the water into one controlled stream.
Moving valuable items
Get your furniture, electronics, and other valuables away from areas affected by water. Heavy items need waterproof tarps or plastic sheeting to stay protected. Make sure you create clear paths when you move larger furniture pieces so everyone can walk safely through the room.
Setting up water collection
Put multiple containers in key spots to catch dripping water. Large garbage bins with wheels work best for big leaks because you can move and empty them easily. Add towels around your collection containers to soak up any splash-over.
To collect water better:
- Rotate your containers so you can empty full ones without missing any water
- Put containers slightly off-center from the drip point to catch the water’s natural fall
- Place a small container in the attic if you can reach it to catch water before it spreads
Take photos and make notes about the damage after you set up these protection measures. Your insurance company will need this documentation, and it helps roofing professionals understand what repairs you need.
Check and empty your collection containers often, especially during heavy rain. You need to keep the leak area dry because wet conditions let mold grow.
Emergency Roof Patching Methods
Quick action with proven emergency patching methods can stop major water damage after you spot the leak source. These quick fixes will protect your home until you can get professional repairs.
Using tarp correctly
A heavy-duty tarp gives you protection for up to 90 days. The quickest way to install starts with measuring the damaged area and adding four feet of overhang from your roof’s peak. You’ll need an anchor board – roll a 2×4-inch board into the tarp’s peak end that extends two feet longer than the tarp’s width.
The tarp needs careful positioning. Tuck it under roofing material or over a ridge to block water entry at the top. Nail down the edges with roofing nails and place heavy boards around the perimeter to keep it stable during windy weather.
Emergency shingle fixes
You have several quick solutions for damaged shingles. Heat guns help straighten curling shingles, or you can use high-quality adhesive to secure loose ones. New shingle installation needs careful alignment with existing ones and secure fastening with roofing nails.
Note that these fixes are just temporary solutions. Large damaged areas need more than just roofing cement – you’ll want materials like rolled roofing too. Weather plays a big role, since patches won’t work well during storms or high winds.
The best protection often comes from combining methods. To cite an instance, putting roofing cement under a well-secured tarp creates multiple barriers against water. This approach works especially well when you have long periods of heavy rain.
Control Interior Water Damage
Quick action is vital to prevent major water damage after a roof leak. Your home can develop mold in just 24-48 hours after water exposure. You need to dry affected areas fast to protect your home’s structure and your family’s health.
Drying wet areas
Start with a wet-dry vacuum to remove standing water in heavily affected spots. Place high-volume fans among structural drying dehumidifiers under the wet areas. You should keep windows and doors open so air moves freely through the space.
Here are the most important steps to dry effectively:
- Take out any water-soaked items right away so mold spores don’t spread
- Switch off your HVAC if it’s flooded to stop potential mold from spreading through the house
- Use moisture meters since you can’t rely on just looking at surfaces to check if they’re dry
Preventing mold growth
The right humidity level is key to stop mold from growing. The Environmental Protection Agency says you should keep relative humidity under 60%. Here’s how to do it:
- Put dehumidifiers in the right spots around wet areas
- Check humidity with a hygrometer – you want 35% or less
- Use a bleach solution to clean and disinfect wet surfaces since it kills both bacteria and fungi
Watch these hidden spots where moisture likes to collect:
- Behind walls
- Under carpets
- Inside air ducts
- Between floor joists
Carpets with heavy water damage need to come out if they stay wet longer than 48 hours. Wet ceiling materials need a full picture – wait at least a week after they’re completely dry before you put mold-resistant paint on fixed surfaces.
Regular checks help you catch hidden moisture problems early. Professional mold inspections are especially helpful to spot issues you might miss. Wet insulation loses its effectiveness and you’ll need new material to keep your home’s temperature right.
Conclusion
Roof leaks need quick thinking and decisive action when heavy rain strikes. Emergency fixes work well temporarily, but a professional assessment remains significant to protect your home’s long-term integrity.
Successful leak management combines three vital elements: quick source identification, interior protection, and emergency patching. Your family’s health depends on controlling moisture levels to prevent dangerous mold growth.
DIY solutions help in emergencies but cannot replace professional repairs. Able Roofing offers free roof inspections to spot weak points before they become major issues. Today’s preventive action saves time, money, and stress tomorrow.