When the sun is out and the kids are home, there’s no better place to be than in the backyard. Spruce up your yard and patio this summer with a few simple do-it-yourself projects for all skill levels. Add some extra seating, create an illuminating fire pit, build a convenient towel rack or enhance the patio with some fresh greenery.
1) Outdoor Couch
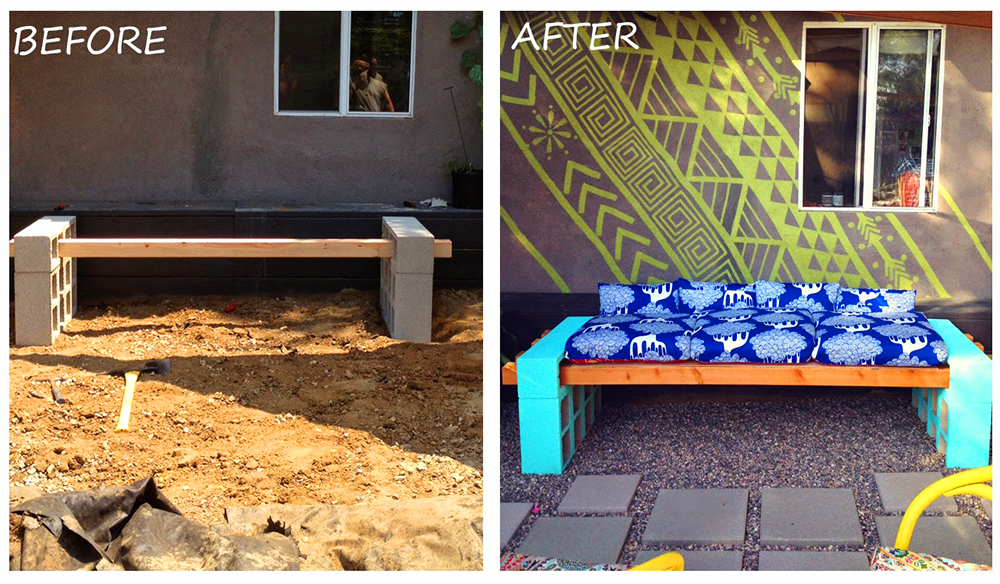
We found the perfect backyard DIY project on Lena Sekine’s blog. Learn how to personalize your seating area with a simple couch made from leftover project items. You will need 12 cinder blocks, four 4” x 4” pieces of lumber of equal lengths, concrete adhesive and cushions. Create two parallel stacks of cinder blocks about eight or nine feet apart (depending on the length of your lumber.) Each stack should have four vertical blocks on the bottom and two horizontal blocks on top.
Insert the wood pieces through each of the top holes of one stack and feed through to the corresponding hole on the other stack. There should be about six inches sticking out on either side.
When the ideal setting has been determined, remove the wood and seal the cinder blocks in place with the concrete adhesive. Feed the wood back through and place the cushions on top when the adhesive is fully dry. For extra flair, you could paint the wood and cinder blocks or reupholster the cushions. For full instructions check out Lena Sekine’s blog.
2) Backyard Fire Pit
Our next project came from Indestructibles. If you have adequate space to safely accommodate a fire pit, this project can create a social center for your backyard or patio. You will need 98 retaining wall blocks, a steel pit ring with tabs, a metal grate, sand and gravel.
First, you will want to dig a hole about seven feet across. Shovel four inches of gravel and four inches of sand in, pat it flat and begin laying the first layer of blocks, making sure it is level. Once the layer has been set, add gravel to the outside of the circle to keep the layer in place.
Place the steel ring on the inside of the blocks as a guide, and continue stacking the rest of the blocks. Spread gravel evenly over the bottom of the pit after the second layer has been placed. Overlap the layers as you continue stacking. You will need to leave a few random gaps for the fire to draw air through.
Set the steel ring on the second to last layer of blocks, then add the last layer. If you find your fires are not burning as strongly as desired, try removing a layer of blocks. If you want to learn more about this project go to the instructables website for the whole blog!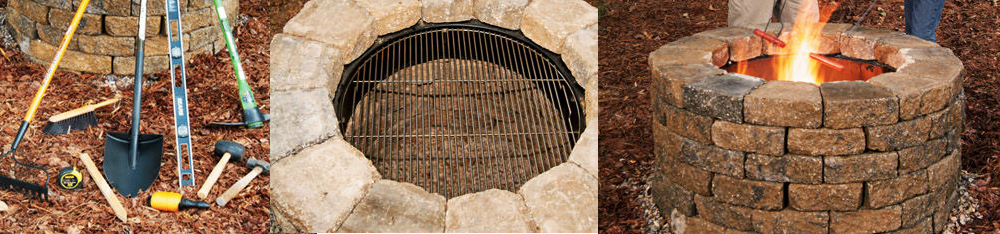
To see more go to: http://www.instructables.com/id/How-to-Build-Your-Own-Fire-Pit/?
3) Multi-level towel rack
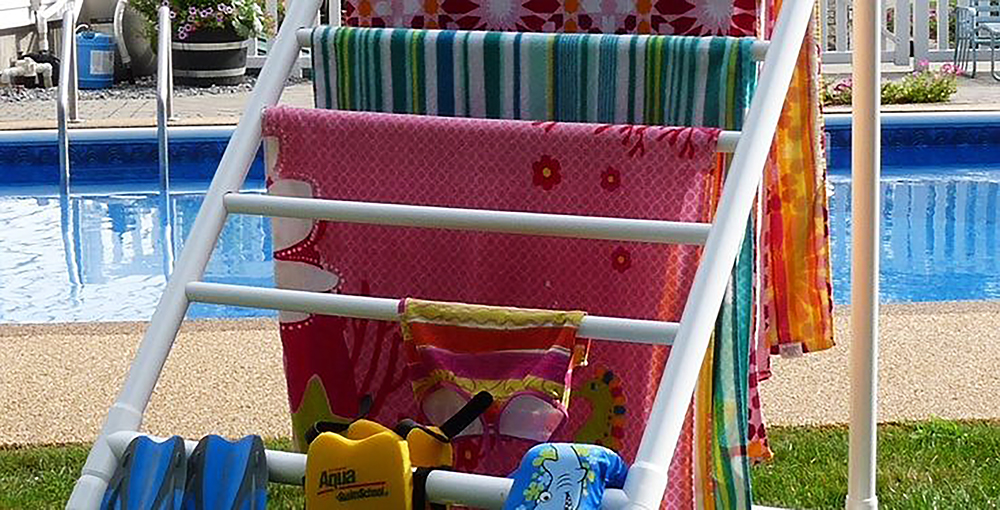
The next project we are sharing is from Smarty Pants Mama. From swimming to water gun fights to sprinklers, there is no shortage of ways for kids to cool off with water in the summer. When the kids get wet, they’ll need to dry off, and finding space for all the towels can be a challenge. With this multi-level towel rack, you can create your own place to organize towels and dry them quickly.
Gather PVC piping, a hack saw and T fittings that fit the piping. Assemble the rack any way you choose. The design from Smarty Pants Mama is great for spreading towels out fully for a faster dry, but with the versatility of the piping you can get creative.
4) Patio Planters
Last, we found DIY patio planters at the Family Handy Man, and you can find full instructions on their blog. Adding greenery to your patio helps make the area a smooth transition from indoor to outdoor. Traditional planters and garden beds can be messy and require maintenance to keep dirt off the patio. These planters allow you to set pre-potted plants right in, allowing you to switch plants out as needed.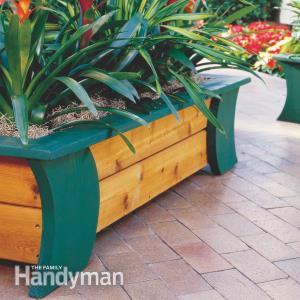
To complete this project, you will need some workshop staples like a hammer, circular saw, power screwdriver, jigsaw, tape measure and clamps. This project has some specific lumber requirements as well. It involves precise measurements and cutting as well as the use of power tools.
Cut the four curved legs out of pressure-treated pine boards and sand the edges to finish. Make the proper cuts, plane the edges of the sideboards and screw the pieces together to prepare the base of the planter. Screw the legs on using three deck screws for each leg. Clamp the sides on and screw them to the legs, again using three deck screws per leg. Make the top apron frame using deck boards, then glue and nail the side pieces on.
You can choose to paint or stain the planter to your preference. It is designed to fit pots with up to an 11 inch diameter and 10.5 inch height. A filler such as wood chips or bark can be used to fill in around the pots for a fuller look.
For full instructions, including a leg cutout template and full supply list, visit Family Handyman.
There are a ton of ways to spruce up your home for the summer. These DIY projects are fun ways to get started, but when it comes to roofing you do not want to DIY. Able Roof has been providing premium quality products and services for over 30 years. We are proud to boast over 250,000 satisfied customers and an A+ rating on the BBB. With one day installation on most projects and lifetime warranty, you know you are getting it done right by getting it done by Able Roof.